The Data Engineer's Guide to Apache Airflow
This article was originally published in Medium.
Apache Airflow is a very popular platform to schedule data pipelines. But what value are getting as Data Engineer when we choose to use this tools? In this article we're going to learn about this.
When people talk about data specialists, I often find that there are a lot of doubts about the different profiles that that exists in the sector. For the sake of brevity I like to refer to this meme:

Why our poor Data Engineer (from now on, DE) is so stressed? Many factors could be affecting him. Data is often chaotic, dirty, unorganized, ingestions change very easily and extractions could broke by many causes. Data pipelines are vulnerable by default.
And what is worse that your pipeline fails? That no one knows it fail! So you business processes and decisions are taken with outdated or wrong data.
Here is when it comes the need for a platform that allows us to achieve at least two things:
- Schedule our data pipelines.
- Inform us when they fail.
This could be achieve by many ways, but Apache Airflow is in integrated tool that was build specifically for solve these and other problems inside a DE team.
Apache Airflow
Apache Airflow is an open-source platform widely used in the data engineering field to schedule batch workflows. It was developed in 2015 by engineers from Airbnb, and later the Apache Foundation took over its development.
This platform enables DE teams to create, schedule, and monitor batch data pipelines through the definition of DAGs (Directed Acyclic Graphs) using Python.

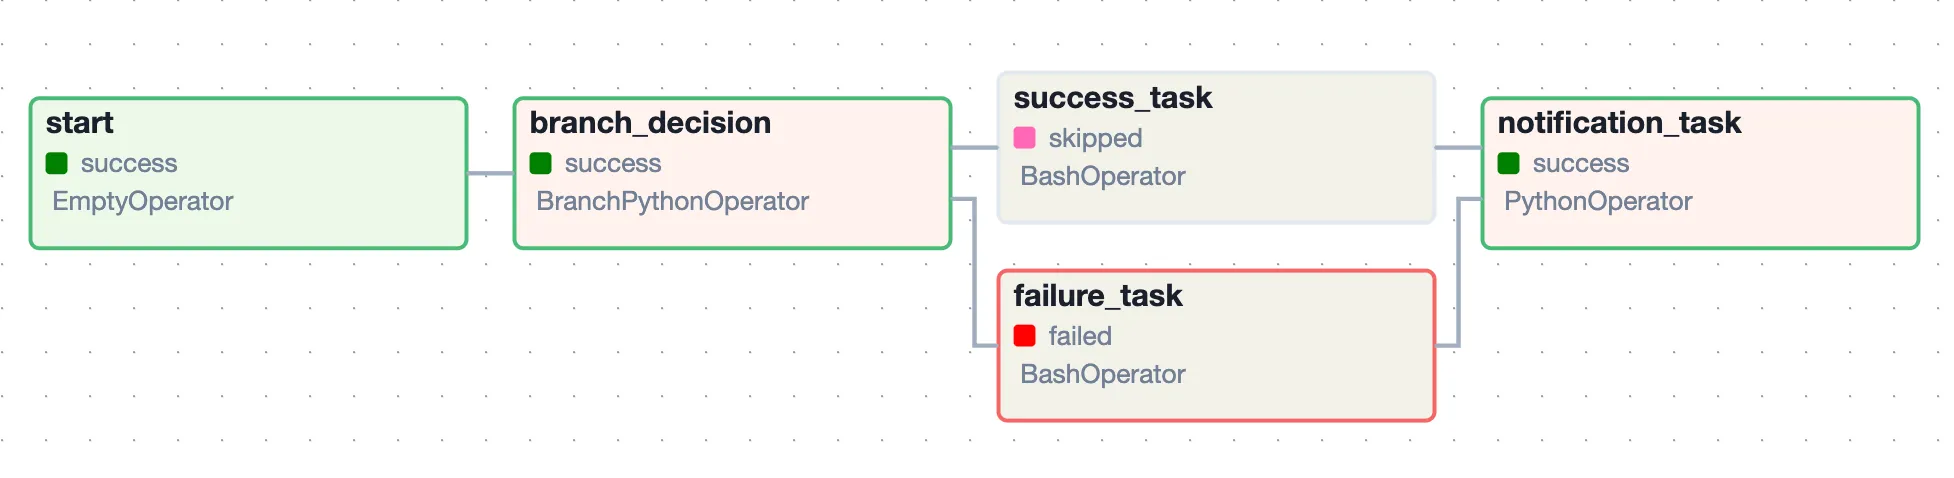
A DAG represents the collection of tasks that need to be run to process a raw batch of data. These tasks are organised in a way that the DAG reflects their relationships and dependencies. Each square in the image at the top represents a “task,” and each task could be a function or a set of functions in an ETL process.
Data engineering (DE) teams find value in using Airflow in different ways, some of which are:
- Scheduling workflows: Airflow ensures that data processes run reliably when the conditions are met, usually by the usage of CRON expressions.
- Monitoring and alerting: Airflow can track the progress of workflows in real-time and send alerts if any issues arise.
- Promoting reusability and modularity: by allowing repetitive process to exist in the same environment, so they could be reused in many DAGs.
- Allowing scalability: Tasks that allow the processing of large data volumes can be organised in a way that scales to accommodate increasing data loads over time.
- Controlling dependencies: Airflow ensures that tasks are executed in the correct order based on their dependencies. This helps prevent data inconsistencies and ensures that downstream tasks only run when their prerequisites have been met.
- Facilitating visualization: Airflow provides a user-friendly interface for monitoring workflows, making it easier for DE to understand the structure and dependencies of their pipelines.
For example, at ClarityAI, our DE team uses DAGs for many tasks, some of which include:
- Ingesting data into our S3 buckets.
- Moving data from S3 buckets to our data warehouse.
- Joining data from different sources to create new datasets.
- Modifying raw data to comply with our internal schemas.
- Updating databases from different environments.
- Running validations over the data.
- Making data available to our final clients in the SaaS platform.
Airflow is like a Swiss Army Knife, assisting us in many processes, and it can surely benefit you too once you start exploring its features. Since my intention is to demonstrate how to use this platform, I’d like to introduce you to a repository where you can test some of Airflow’s capabilities
Airflow Dummy Repository
In the second half of this post I like to present a situation where Airflow adds a lot of value to the daily process of a DE, while review some theoretical concepts of the platform
Please, download this repository. Is going to be the boiler plate to run your first Airflow instance in local.
You're going to be running Airflow in Docker. The only pre-requisite that is needed in to have Docker compose installed.
Clone the repo (or download it as a zip file) and run the following command docker-compose airflow-init to start the local database and docker-compose up to run the webserver.
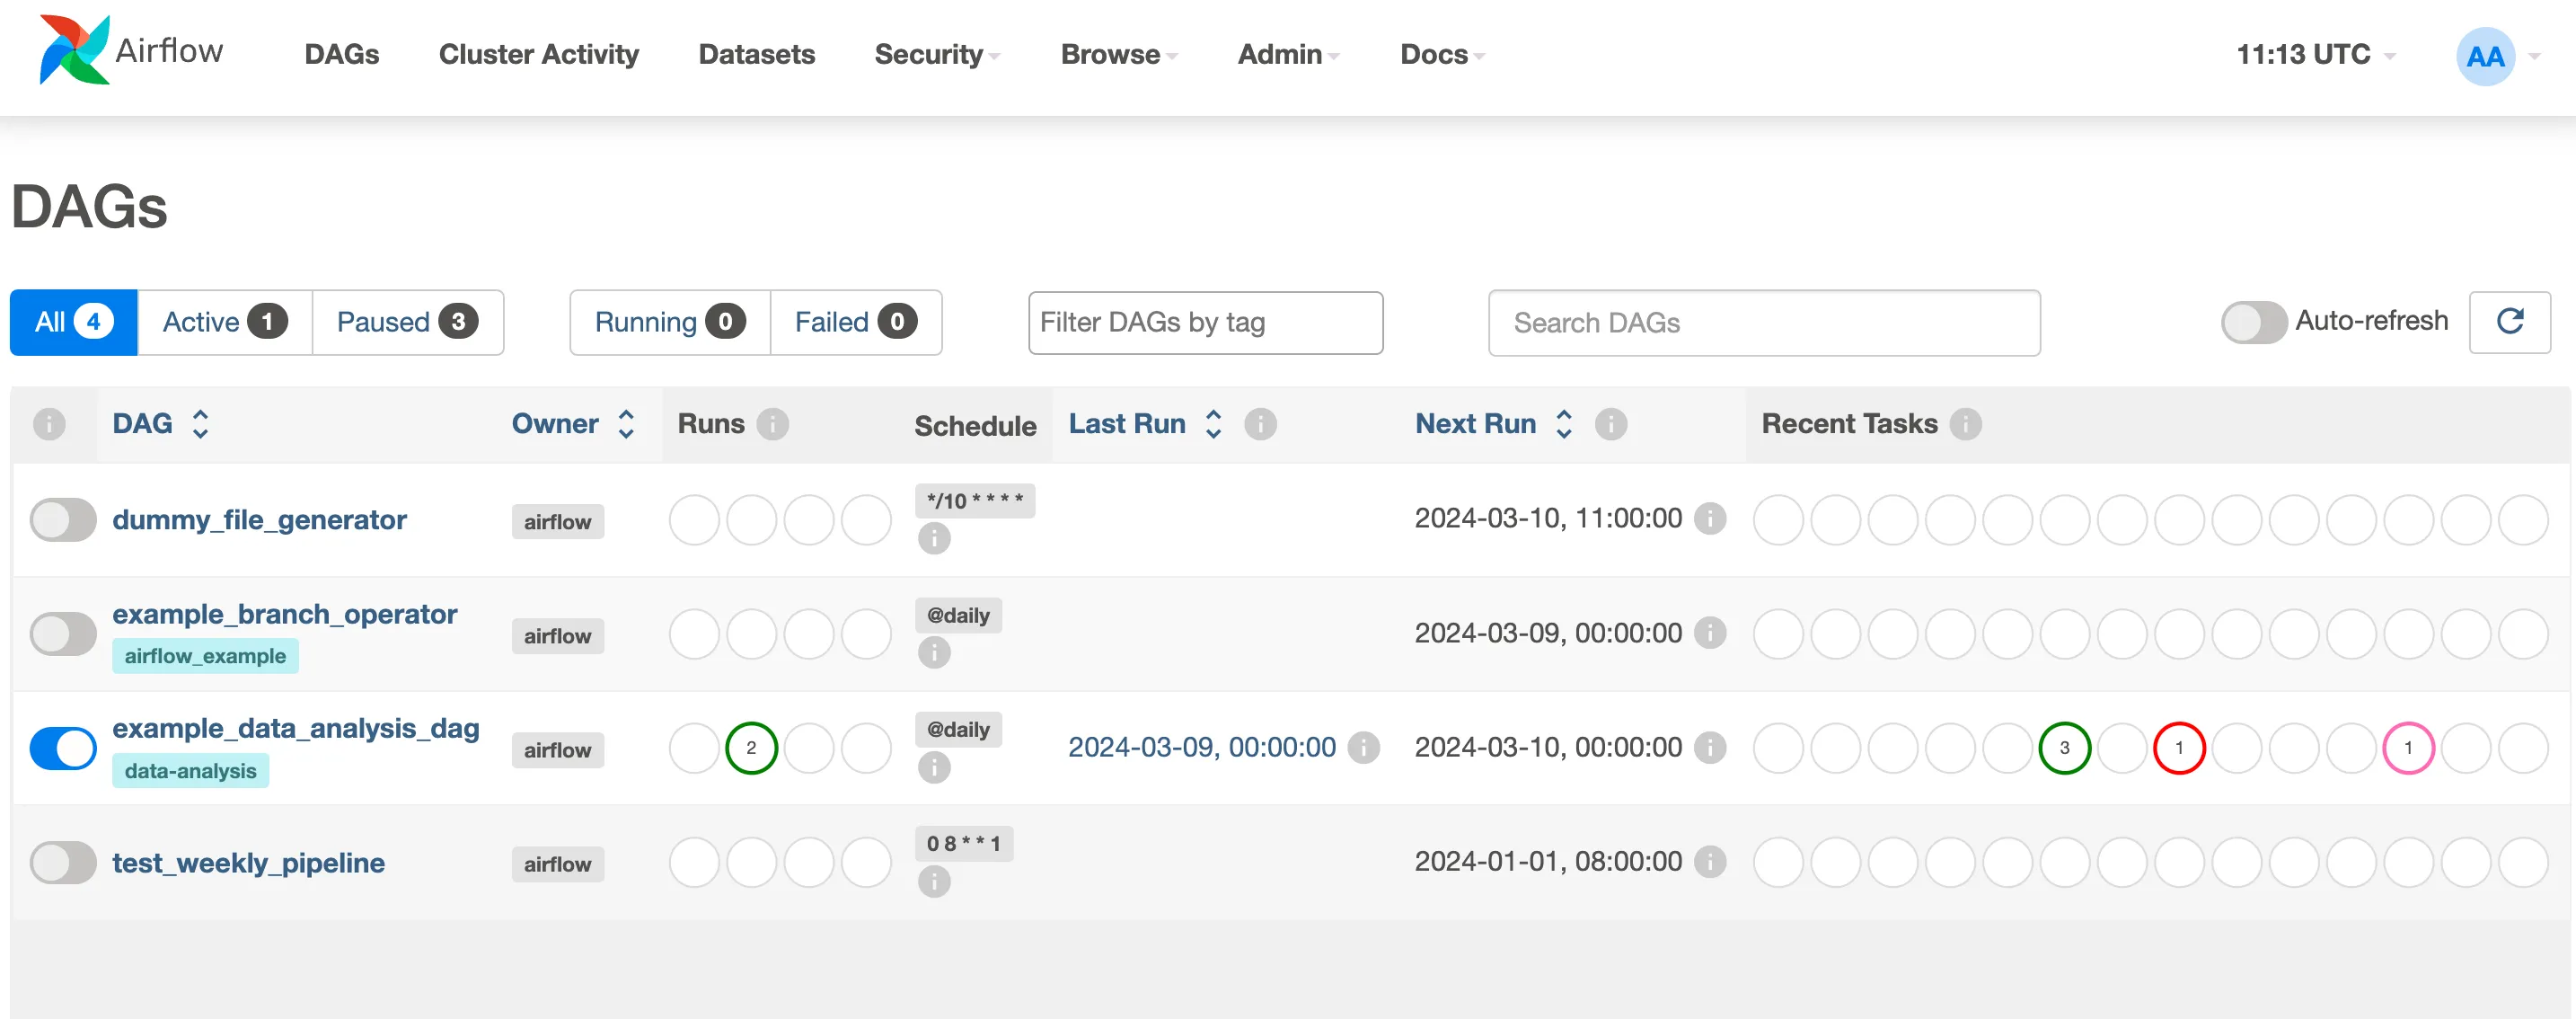
In localhost:8080 you should see a login window. The default user/password for airflow in: airflow/airflow. Login and then you're going see a set of dags.
Airflow Architecture
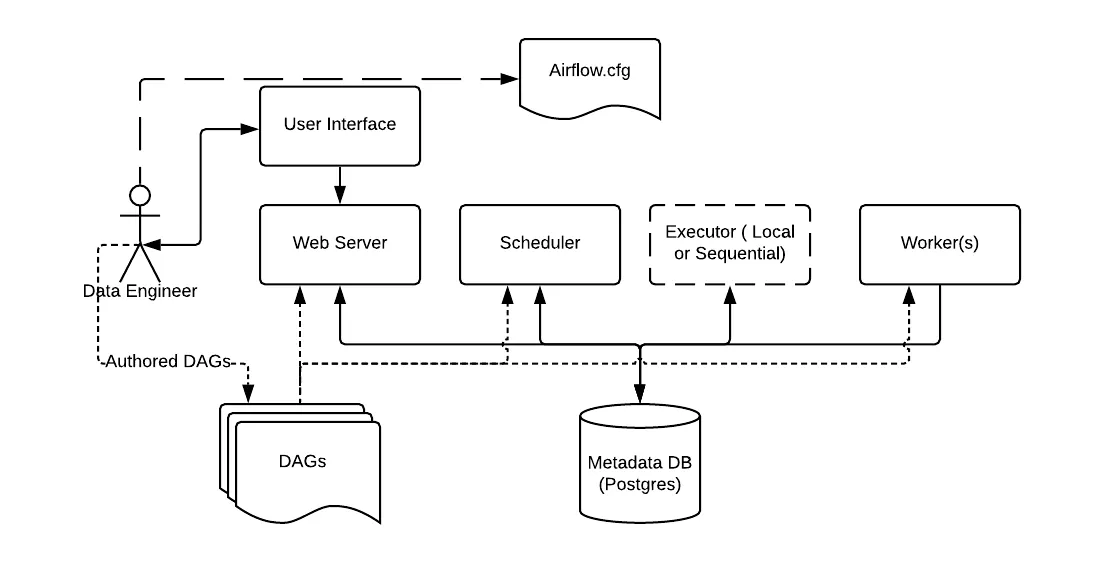
The image above show the basic Airflow Architecture, this a good starting point to understand what you're seeing in your device after you Airflow session was started.
First, I want you to focus in the DE. In the infographic you could see that the DE interacts with Airflow through 3 different block
- DAGs: containing Python code that represents a data pipeline.
- User interface: That depends on the Webserver and if the UX that allow to monitor and manually trigger the DAGs.
- Airflow.cfg: A file that contains the configuration of the environment. The official documentation is here airflow.cfg file.
Since this tutorial works with a simplified environment, the airflow.cfg is "embedded" in the docker-compose file. In the "x-airflow-common" section are defined a series of environment variables that is going to be used across all the services brought up by the docker file.
x-airflow-common:
  &airflow-common
  build: .
  environment:
    &airflow-common-env
    AIRFLOW__CORE__EXECUTOR: CeleryExecutor
    AIRFLOW__DATABASE__SQL_ALCHEMY_CONN: postgresql+psycopg2://airflow:airflow@postgres/airflow
    AIRFLOW__CELERY__RESULT_BACKEND: db+postgresql://airflow:airflow@postgres/airflow
    AIRFLOW__CELERY__BROKER_URL: redis://:@redis:6379/0
    AIRFLOW__CORE__FERNET_KEY: ''
    AIRFLOW__CORE__DAGS_ARE_PAUSED_AT_CREATION: 'true'
    AIRFLOW__CORE__LOAD_EXAMPLES: 'false'
    AIRFLOW__API__ACCESS_CONTROL_ALLOW_HEADERS: 'true'
    AIRFLOW__API__AUTH_BACKENDS: 'airflow.api.auth.backend.basic_auth,airflow.api.auth.backend.session'
We're not going to check this configuration in this article, but leave a comment at the end if you want to know more.
After these environment variables, you could find the definition of the different server needed to airflow to exist. Let's comment them.
- Metadata DB: Is an Postgres SQL database that store metadata about the all the DAGs being run, users and much more information.
- Web Server: Is running a Flask web application under the hood, which communicates with the Airflow Metadata DB to retrieve and display information. It’s launched separately from the Airflow scheduler and worker(s) but is an integral part of the Airflow ecosystem,
- Scheduler: Is the brain behind Airflow, it monitor all tasks and DAGs and triggers task once this dependencies are complete. It is designed to run as a persistent service and it is also configured by airflow.cfg.
- Executor: Are mechanism by which task instances get run. Airflow support many executor, in productive environment we mostly use KubernetExecutor but there are many more.
- Worker: Are separated instances which job into run specific task inside a Airflow.
Good, keep this in mind. Because now we're going to see how everything work inside with a DAG.
Putting theory into work. Your first DAG
In this section we're going to be commenting the code of a DAG and see what is happening every time we trigger it.
from datetime import datetime
from airflow import DAG
from airflow.operators.dummy import DummyOperator
from airflow.operators.bash import BashOperator
from airflow.operators.python import BranchPythonOperator, PythonOperator
from airflow.utils.trigger_rule import TriggerRule
from airflow.models import TaskInstance
import random

def branch_decision(**context):
    """Randomly choose between success (True) and failure (False)."""
    return 'success_task' if random.choice([True, False]) else 'failure_task'

def notify_outcome(ti: TaskInstance, **context):
    """Log the notification message using the default logger."""
    outcome = ti.xcom_pull(task_ids='branch_decision')
    if outcome == 'success_task':
        notification_message = 'Success: The operation was successful.'
    else:
        notification_message = 'Failure: The operation failed.'
    ti.log.info(notification_message)
    return notification_message

# PART 1. Definition of the DAG
with DAG(
    dag_id='example_data_analysis_dag',
    start_date=datetime(2024,3,5),
    default_args={
        'owner': 'airflow',
    },
    description='A DAG for data analysis with dynamic notification based on outcome',
    schedule_interval="@daily",
    catchup=False,
    tags=['data-analysis'],
) as dag:

    # PART 2. Definition of the tasks
    start = DummyOperator(task_id='start')

    data_analysis = BranchPythonOperator(
        task_id='branch_decision',
        python_callable=branch_decision,
    )

    success_task = BashOperator(
        task_id='success_task',
        bash_command='echo "Operation succeeded."',
    )

    failure_task = BashOperator(
        task_id='failure_task',
        bash_command='echo "Operation failed." && exit 1',
    )

    notification_task = PythonOperator(
        task_id='notification_task',
        python_callable=notify_outcome,
        trigger_rule=TriggerRule.DUMMY
    )

    # PART 3. Definition of the Workflow
    start >> data_analysis >> [success_task, failure_task]
    [success_task, failure_task] >> notification_task
PART 1. Definition of the DAG
The first part we're going to focus is the definition of the DAG. It start with the DAG object. Any DAG should have at least 3 elements: an unique identifier (dag_id), an schedule and an start_date.
The 'schedule' argument is where we define expression to indicate when the DAG is triggered. DAGs are triggered each time that the schedule conditions are met and Airflow create an unique 'dag_runid' to associate and store event that occurred in an execution.
PART 2. Definition of the tasks
To define elements of a task Airflow have defined a series of Operators: elements that could be used to call functions. Some of the most common ones are the Python, Bash and Kubernetes Operator.
In this case, the data_analysis object is a PythonOperator that calls the branch_decision function.
Task can talk between thenselves thank to cross-communication (XComs). In this DAG, the 'notify_outcome function' capture the return value of the branc_decision task. This value is automatically stored in XCom under the task’s ID and used to send different notification messages.
PART 3. Workflow Definition
To defines the dependencies between tasks, Airflow uses what is called Bitshift Composition. This is the usage of >>to indicate how task should be triggered.
But the relationship between task could also be much more alternative with the usage of TriggerRules. The default rule is 'all_success', but in this case the DUMMY rule is setted, so notification_task is triggered whatever happens before.
When triggering a DAG
When the DAG is triggered, the Airflow scheduler places it on the queue for execution, and then workers are assigned to execute each task within the DAG.
The execution begins with the start task, a DummyOperator that essentially acts as a placeholder marking the beginning. Following this, the branch_decision task, a BranchPythonOperator, randomly selects between success_task and failure_task based on its internal logic, automatically pushing its decision to XCom.
Based on this decision, the workflow continues to either of the aforementioned task. Both of these tasks are BashOperators executing simple echo commands, with failure_task designed to exit with a non-zero status to simulate a failure.
After either of these tasks completes, the notification_task (a PythonOperator) is executed, which pulls the outcome of the branch_decision task from XCom and logs a corresponding success or failure message.
Throughout this process, Airflow manages task dependencies, execution order, and the passing of contextual information (like XCom values) between tasks.
All the information about this runs is stored in the Postgres DB and could be accessed querying directly or using a REST API that Airflow provides.
Wrapping Up
Before we end, I wanted to share a bit about what we’ve covered. Originally, I had plans to dive into more ways we can use Apache Airflow, like triggering data pipelines with the output of other DAGs or dynamically creating tasks based on input arguments to a DAG. But for now, I thought it best to keep things straightforward.
Airflow is one of the tools, but not the only tool, that we use on a day-to-day basis to solve problems in the data engineering office. At ClarityAI, we like to see ourselves as product engineers. Every day, we focus more on building software solutions to allow our internal clients to find value in the data that we manage and ingest.
If you found this helpful, please give it a thumbs up and share it with others. Your feedback will help me decide if I should dive deeper into this topic in the future.
Thanks for joining me on this journey. Until next time!